BEST Baked Cauliflower “Mac” and Cheese
This post may contain affiliate links. Please read our disclosure policy.
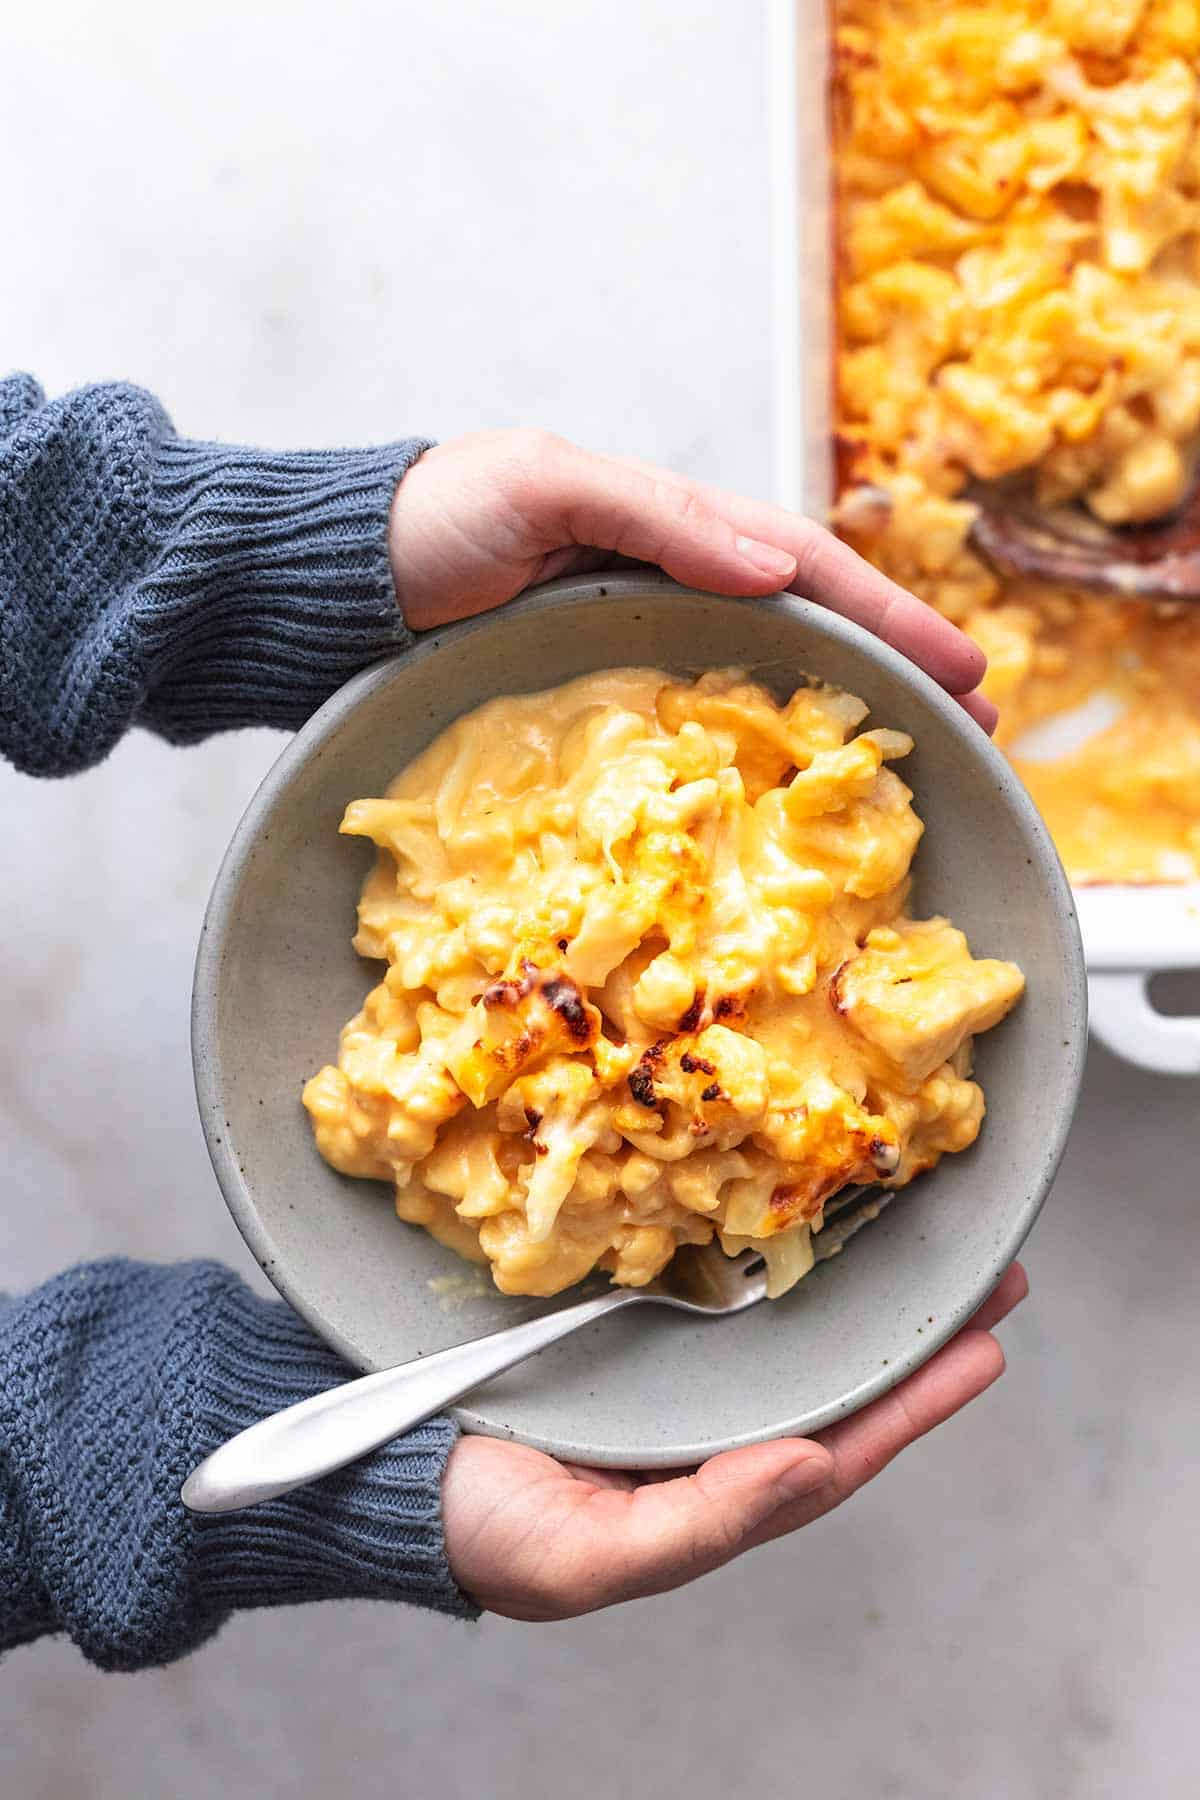
You’ll never miss the “mac” in this delicious Cauliflower Mac and Cheese dish! Cheesy, buttery, ooey, gooey, and comforting, this recipe is a great way to get a serving of veggies and your pasta fix without the heavy carbs.
Looking for all the cauliflower everything? Try these recipes for Easy Buffalo Cauliflower, Roasted Cauliflower Soup, and Baked Sweet and Sour Cauliflower.
Why This Recipe Works
Cauliflower — I know this goes without saying because how would this recipe work without cauliflower but it truly has been a game-changer for me when cooking, knowing there’s this versatile veggie I can use instead of pasta, potatoes, rice…so many other things. It’s fun to mix it up once in a while and having an extra serving or two of veggies never hurt anybody.
Hand-shredded cheese — I’m all about the kind of shredded cheese you shred yourself. Why? Well store-bought shredded cheese is coated with this powdery substance that keeps it from all caking together in the bag. That substance that keeps it from caking also keeps it from melting together well and leaves the cheese with a grainy taste and texture. Do yourself a favor and grate it yourself — it’s even more economical that way too.
That roux — You have to make a roux (butter/flour mixture detailed below) to get the cheese to fold in correctly and melt smoothly and consistently. I’ve skipped this step before and what you end up with is cauliflower with melted cheese pieces stuck to it. Definitely not creamy and cauliflower mac and cheese – like at all.
Leftovers — This recipe heats up well the next day and the day after too (if you have any left, that is). Mac and cheese for daaaays.
Here’s How You Make It
- First, set the oven to 375 degrees to preheat it. (not pictured)
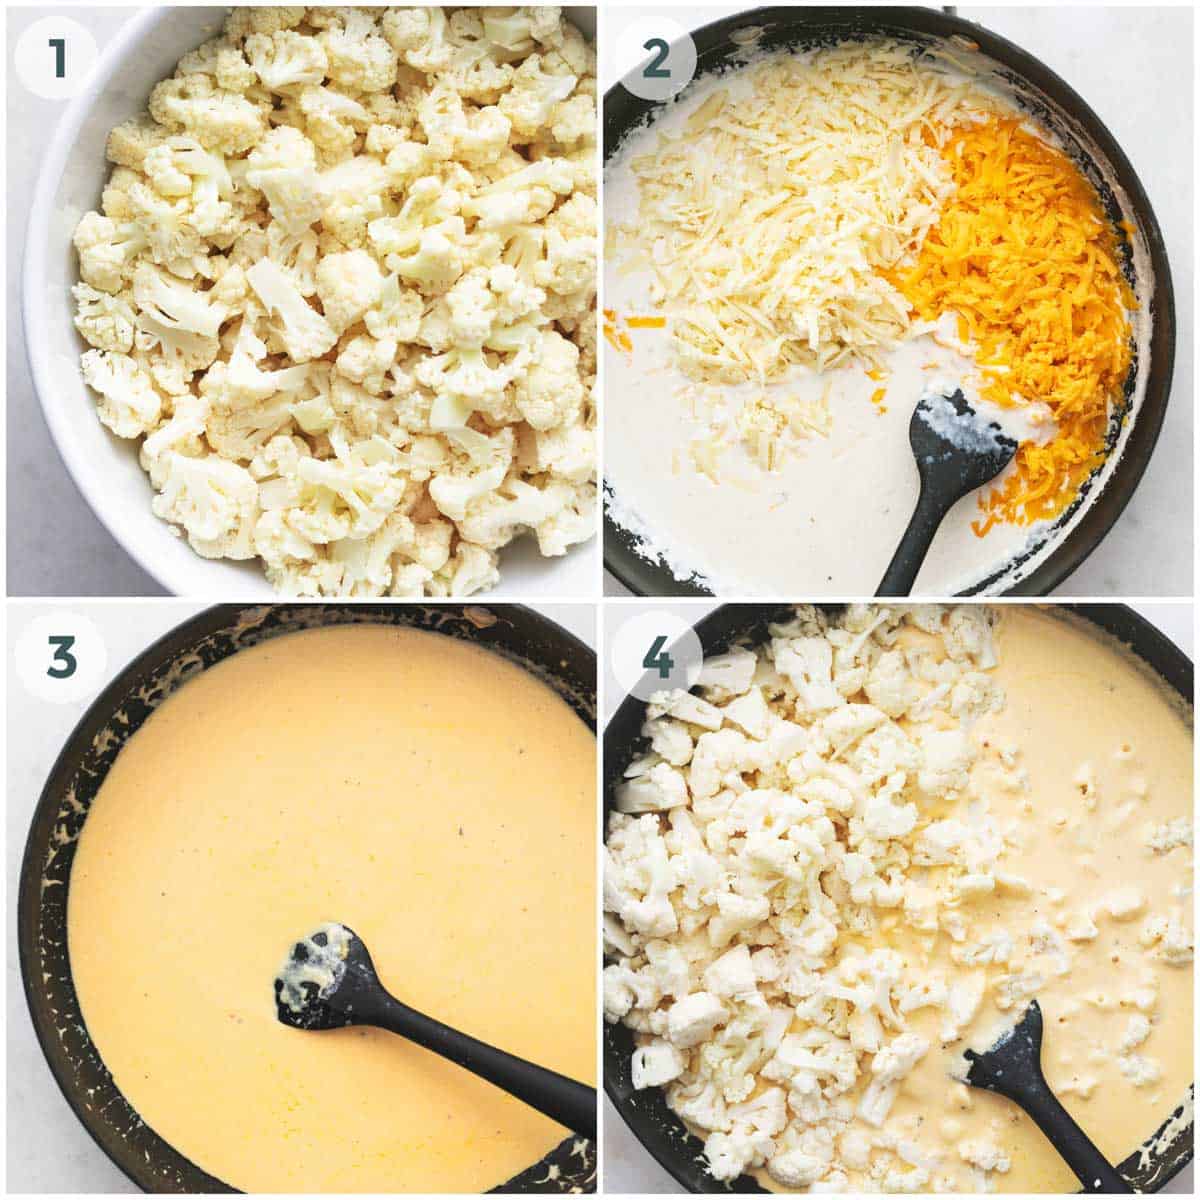
- Steam the cauliflower in the microwave by filling a microwave-safe bowl with about an inch of water, then the cauliflower and popping in the microwave for 8 minutes. Carefully drain the water out of the bowl and set aside. (photo 1)
- In a large saucepan over medium-high heat, melt the butter. (not pictured)
- Stir the flour into the melted butter for about 3 minutes, stirring continuously to make a roux. (not pictured)
- Now whisk in the milk into the flour/butter mixture a little bit at a time until the milk is totally incorporated and the mixture thickens and is smooth. (not pictured)
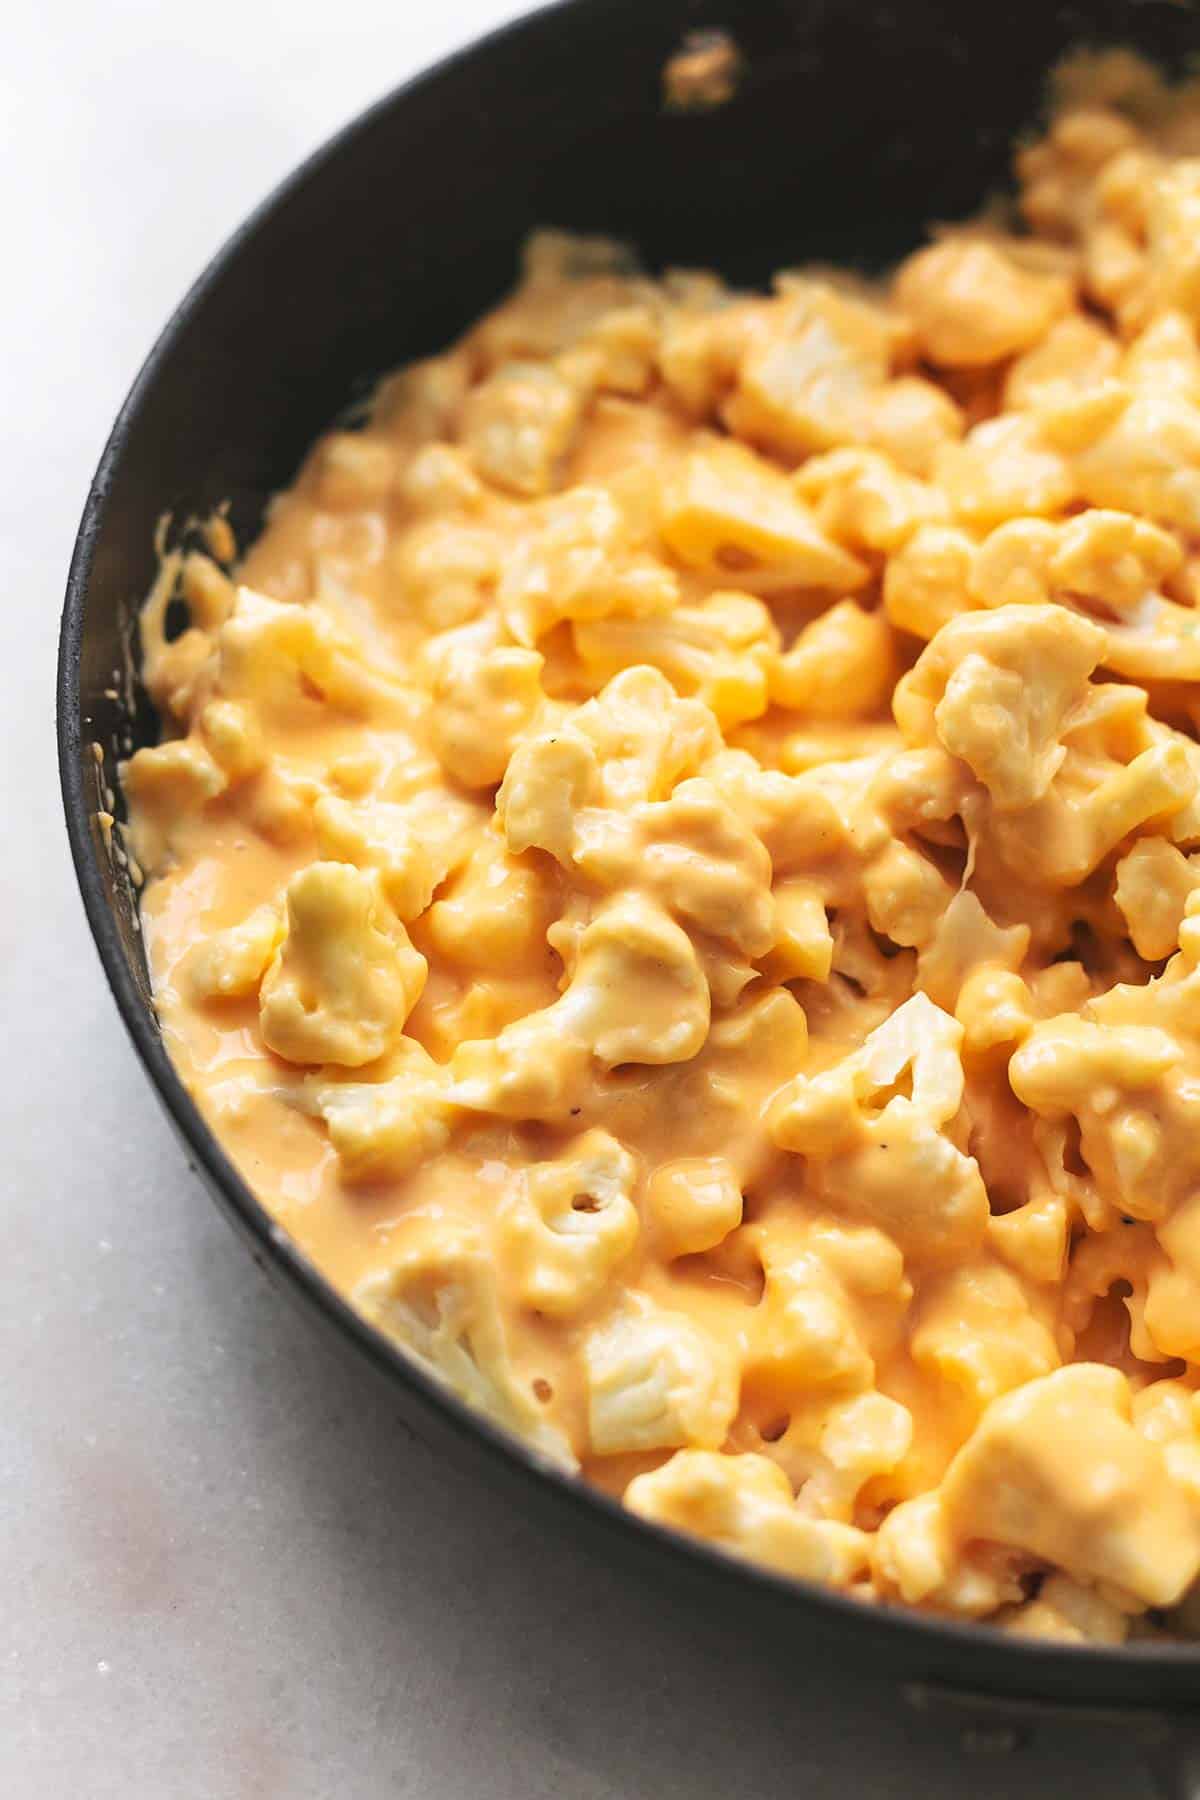
- Take the saucepan off the heat, and stir in the garlic powder, salt, pepper, and shredded cheese until that’s thoroughly melted and smooth as well. (photo 2-3)
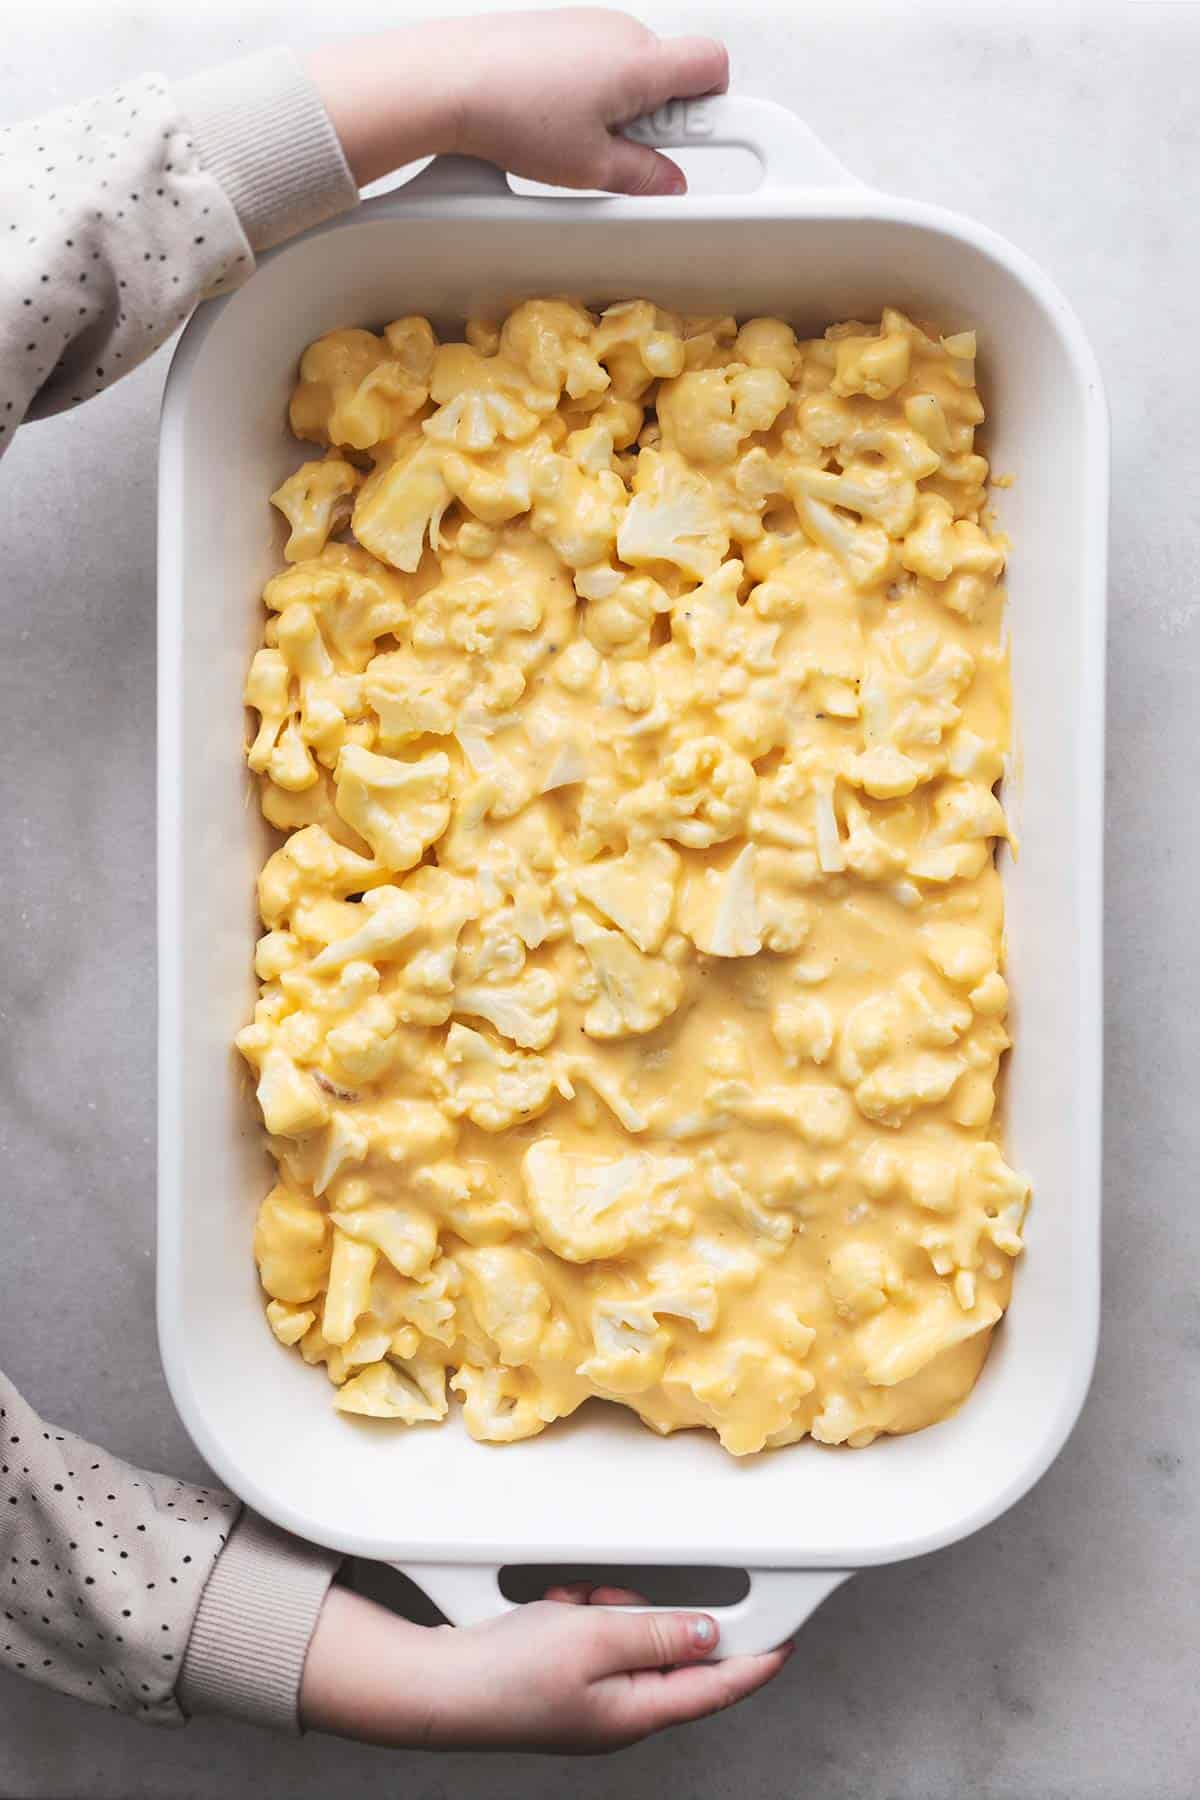
- Add the cauliflower to the cheese in the saucepan, stir it all together and pour it into a prepared 9×13-in. baking dish. (photo 4)
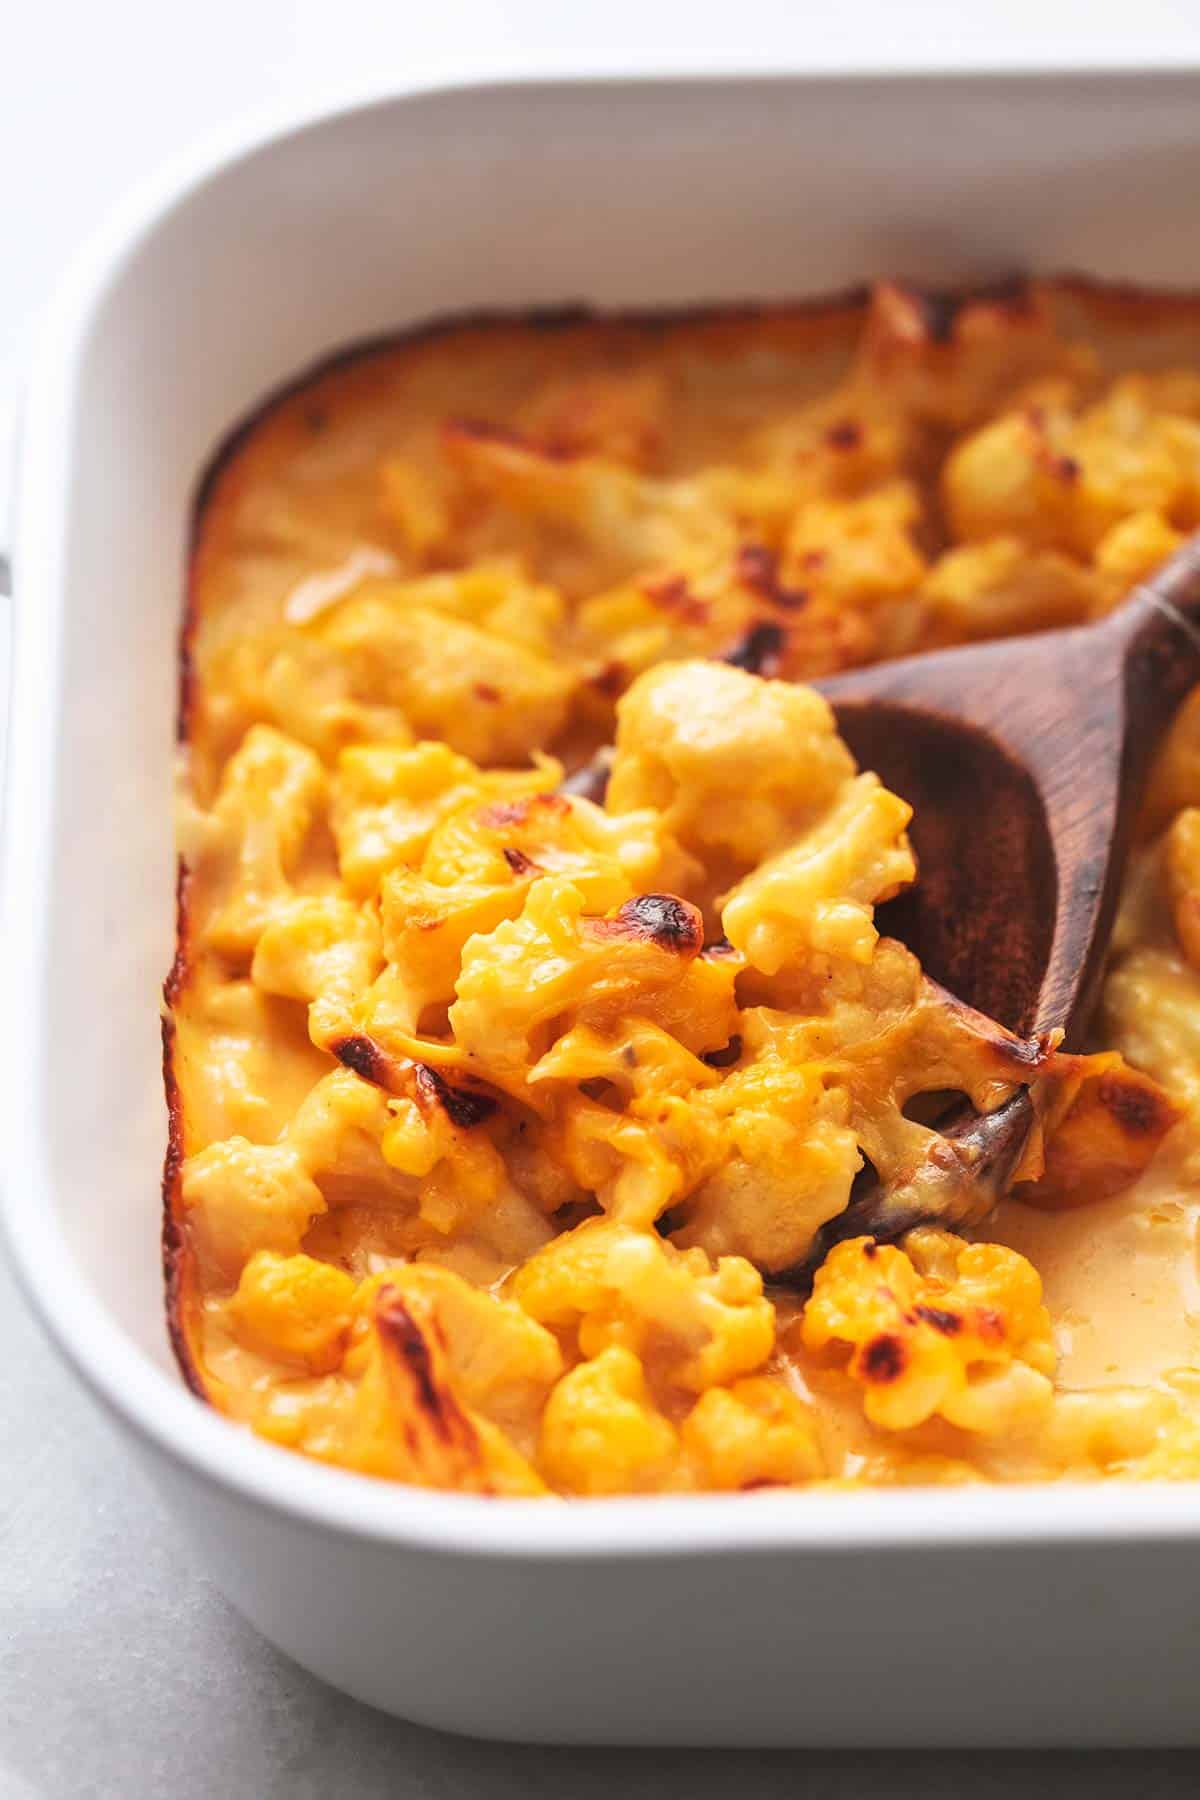
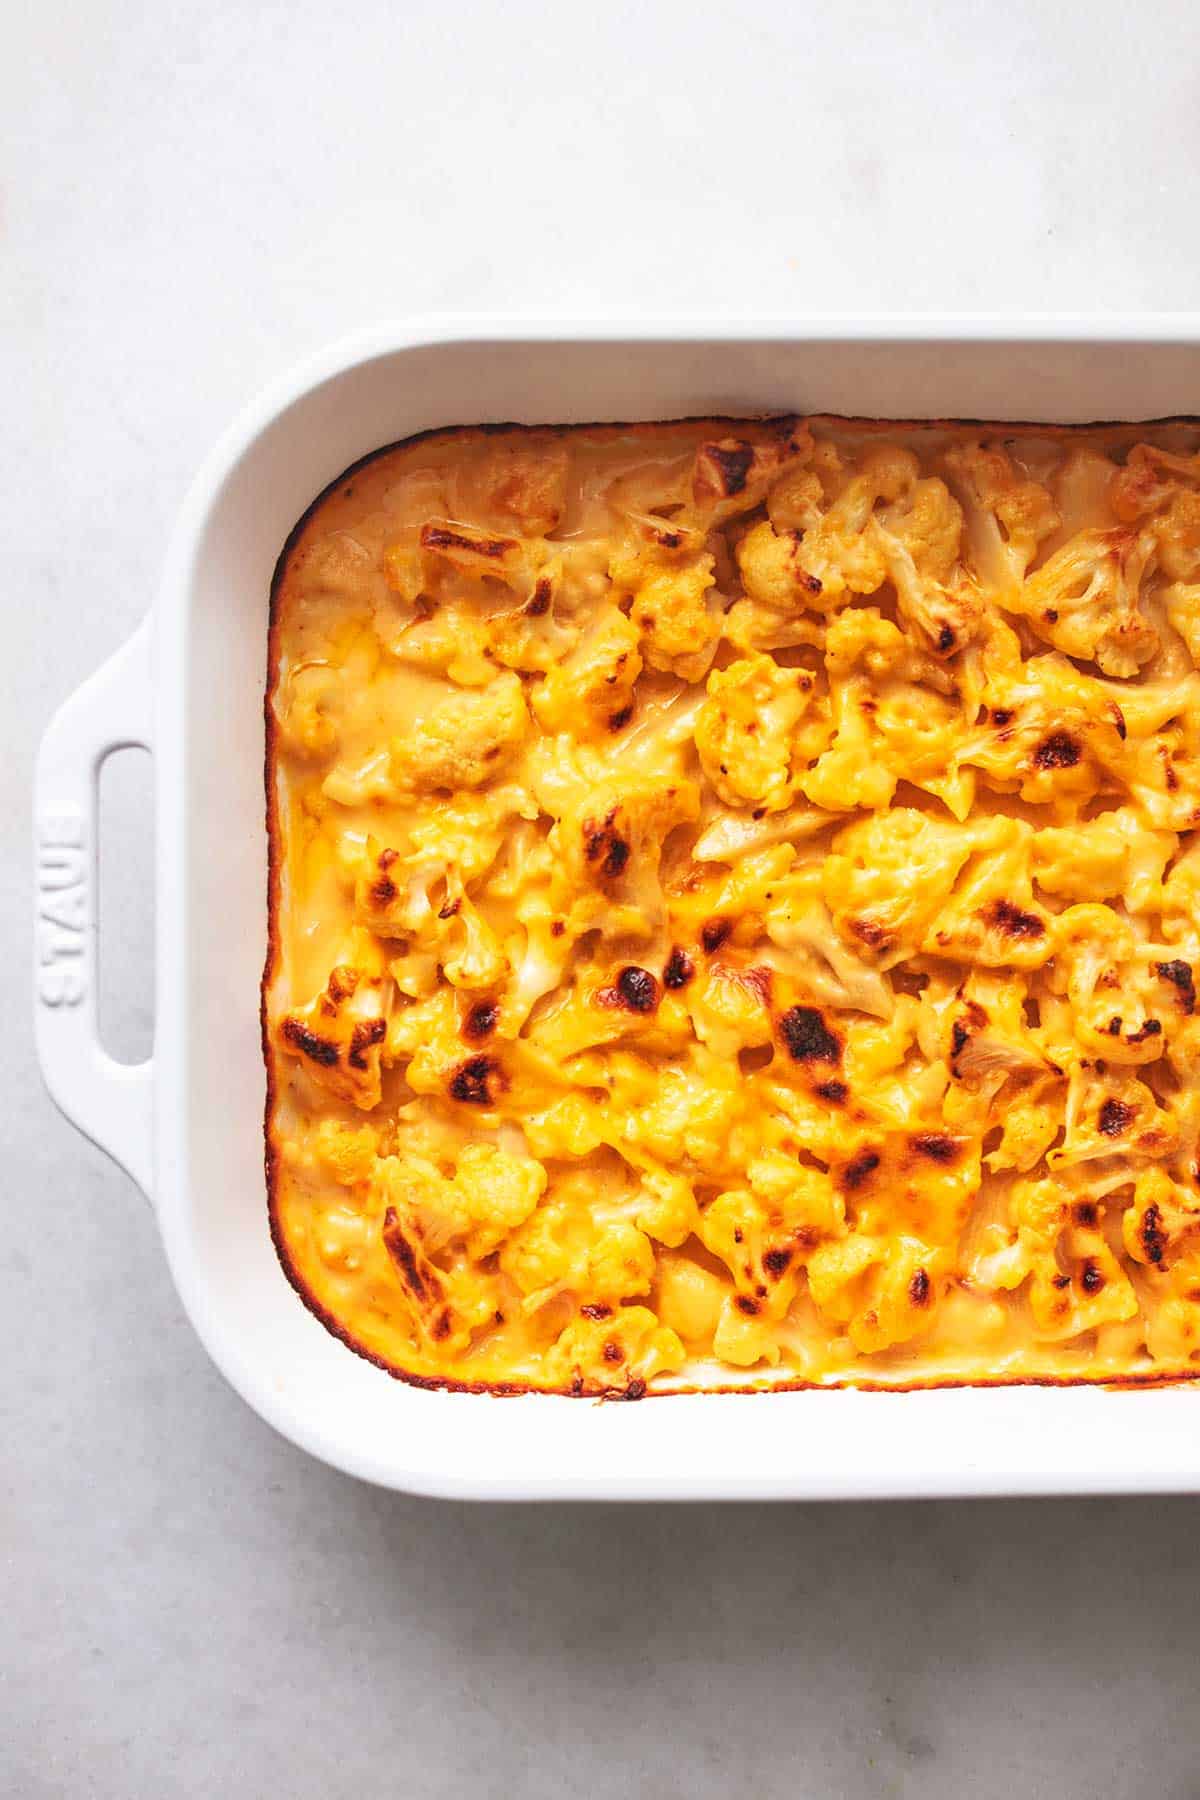
- Put the dish into the oven for 25 minutes until the cheese is bubbly and the outsides begin to brown. Switch the oven to “broil” for 2-4 minutes to really brown that top if you wish. (not pictured)
- Pull the baking dish from the oven and allow to cool a little before serving. (not pictured)
Frequently Asked Questions
While sharp cheddar cheese is my favorite cheese in all mac and cheese varieties, there are quite a number of delicious cheeses that work great too.
– Mild or medium cheddar
– Parmesan (I like to mix parm with another cheese)
– Pepper jack
– Gouda
– Gruyere
– Goat cheese (I mix this one too)
– Brie (this one works great, but it is a super sticky, melty cheese so you don’t have to go too heavy on it).
– Monterey jack
Expert Tips
- Remember to use that hand-shredded cheese in this cauliflower mac and cheese. (Grate on a block or in a food processor with the appropriate attachment if you have it). I love using sharp cheddar but another version of cheddar works great, as well as pepper jack, or mix a couple of your favorite cheeses if you like too, so long as they add up to two cups.
- When choosing a head of cauliflower, make sure it is heavy, thick, and compact. You want the leaves to be green and not yellow or wilting. If some of the florets are browning, you can cut those off if it’s just a spot or two, but avoid any that are very brown or heads that are soft.
- If you want to avoid watery cauliflower mac and cheese, after you drain the cauliflower from steaming in the microwave you can pat it dry with a paper towel. Or, I’ll drain the water off, then dump the cauliflower onto a kitchen towel and let it sit and dry a bit while I’m making the cheese sauce.
More Tasty Cauliflower Recipes
- Easy Buffalo Cauliflower
- Roasted Cauliflower and Broccoli
- Cauliflower Fried Rice
- Sweet and Sour Cauliflower
- Parmesan Roasted Cauliflower
Did you make this baked Cauliflower Mac and Cheese recipe? YAY! Please rate the recipe below!

BEST Baked Cauliflower “Mac” and Cheese
Ingredients
- 6-8 cups cauliflower, chopped into 1-inch pieces (I used 1 1/2 heads of cauliflower)
- 2 tablespoons butter
- 3 tablespoons flour
- 2 cups whole milk
- 1 ½ teaspoons salt
- ¼ teaspoon cracked black pepper
- ½ teaspoon garlic powder
- 2 cups shredded sharp cheddar cheese, 8 ounces, see note
Instructions
- Preheat oven to 375 degrees.
- Fill a microwave-safe bowl with 1 inch of water. Add cauliflower to the bowl and microwave on high for 8 minutes. Drain and set cauliflower aside.
- In a large sauce pan, melt butter over medium heat.
- Stir in flour for about 3 minutes.
- Gradually whisk in the milk, a little at a time, until completely incorporated and mixture is thick and smooth.
- Remove from heat, salt, pepper, stir in garlic powder, and shredded cheese until melted and completely incorporated and smooth.
- Stir in cauliflower. Transfer to a 9×13 inch baking dish.
- BAKE for 25 minutes until cheese is bubbly and begins to brown. Switch to BROIL for 2-4 minutes to brown the top a bit more.
- Dish will be hot! Allow to cool slightly before serving.
Notes
- You can swap out some or all of the cheese for another kind. I have made this with white cheddar cheese and it is delicious. Try half white cheddar, half pepper jack for a bit of a kick!
Nutrition
Nutrition information is automatically calculated, so should only be used as an approximation.


Is it good when reheated?
Yes, it should last 2-3 days 🙂
I love this recipe. I need tips on reheating or freezing. I can only eat small portions and my kids won’t eat it.. ty!
I’m happy to hear you enjoy this recipe! This recipe will last in the fridge for about 3 days. To reheat, you can either use the oven, cooktop or microwave. For the oven, preheat to 350. Drizzle dish with a splash of milk or cream and cover with foil. Heat for 15-20 minutes or until it’s heated through. To crisp up the top layer, uncover for the last 5 minutes. You can also sprinkle cheese on top to help it crisp up again. For the cooktop, warm over low to medium-low heat and stir frequently. You want to add that splash of milk or cream again. Warm through. This should be about 5-10 minutes. And finally for the microwave, placing the food in a microwave safe bowl, add 1-2 tb of milk or cream, stir gently, cover loosely, then heat for 30 seconds to a minute until heated through. Stir between each internal. Finally let it sit for a couple minutes before enjoying.
To freeze this dish, you of course want it to be completely cooled before storming in an air tight container. Or you can store it in portion sized bags or air tight containers. You can also assemble this dish and not bake it and freeze until later but you’ll want to let it thaw before baking and you may need an extra few minutes to bake it. With either of these, this dish should be good in the freezer for up to 3 months.
This was delicious, we roasted the cauliflower rather than steaming for extra flavour…. and we did use shredded cheese bc that’s all we had on hand but it all worked out.
My youngest even said that it was better than regular Mac and cheese. Which they get on occasion, as a treat!! WIN!!!
This “Mac” and cheese was amazing! To add more flavour, I added a couple teaspoons of worcestershire sauce, a teaspoon of yellow mustard, and some chilli powder for colour since I only used white cheddar cheese. I also added in about a quarter cup of cream cheese to add some richness.
Could I use riced cauliflower?
This recipe hasn’t been tested with rice cauliflower but I think it would work!
This was a quick and easy recipe. My family loved it. Thank you
Thank you! It’s always good to hear when people enjoy these recipes 🙂
Thanks Giving must!! Thank you
That’s so kind! Thank you! 🙂
Can I boil cauliflower if I do not have microwave
Yes 🙂
Can you use frozen?
Yes, if you thaw it and drain the excess water 🙂
I really liked this recipe as a starting point. I’m trying to eat fewer carbs but not go completely carb free, so I added 2 cups of cooked macaroni and 2 cubed chicken breasts into the baking dish. I reduced the salt to 1 tsp because we are trying to reduce that in our diets, and I added a 1/4 tsp of nutmeg (my secret ingredient). Then I sprinkled some Parm on top before baking. Turned out great!
So delicious!
Any tips for a less runny sauce after it bakes? I let it cool a few minutes but the cheese sauce was still thin when I served it. I followed your instructions exactly. The cheese sauce was very thick when I popped it in the oven, but runny in the end.
It should be a bit thinner but not too much of course. It sounds like it wasn’t thick enough before putting it in the oven. You can try making it thicker by keeping it on the heat longer or adding a bit more flour.
Let your cauliflower dry out a bit. That might be why your sauce got too thin.